Monday, December 21, 2009

40K MODULAR TABLE

If you were putting the tiles on a surface that was at least 4'x6', then you could probably get away letting gravity keep it all together. However, there's always table bumping and the support surface is often smaller (like a kitchen or folding table), meaning a portion of the tiles need to be able to cantilever off the edge.

They need to be joined somehow, and while I have many ideas about how to do this, the one in the lead at the moment involves clevis pins and hair-pin clips...you may be familiar with them by a different name, so here's what I'm talking about looking under the tiles: (color for clarity)

I'm showing three holes per side in case the tile has a feature that dips below the playing surface, as discussed in the last post and shown here: (pinned at highlighted locations)
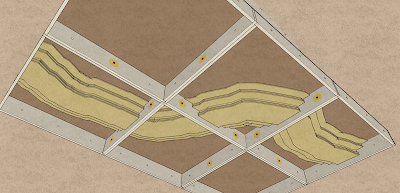
Bolts and wing-nuts would provide a more secure connection, but wouldn't be quite as convenient. However, it would be easy to have both on hand and use whichever was more appropriate.


And here's a look at some modular hills placed on the playing surface instead of being joined to the surface:
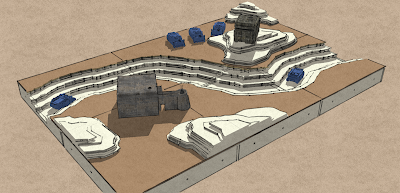
P.S. The bunkers and vehicles are from 3D Warehouse, my thanks to the original modelers.

See part 1 of this modular table idea here.


Wednesday, December 16, 2009

40k Terrain - Modular layout

While I know using 24"x24" table 'tiles' increases the number of joints (and therefore helps in guessing ranges/distances), I still think they have merit due to their flexibility. The discussion over at Strictly Average inspired me to post some of my past terrain thoughts (which are now on hold, due to the Waaaagh!)

The idea: Instead of flat 24x24 modules, build simple 5-sided boxes so that the main playing surface is elevated. This gives you the freedom to go both above 'grade' and below.
Also, while I like the idea of modular hills, I don't think I'll include them in the table tiles. Done separately from the table, the hills would be more flexible and could hide the table joints/measuring aides.


See part 2 of this modular table idea here.

See how to make the buildings here.

Friday, December 11, 2009

Mek Update...

Crawling slowly toward completion. I think I might stop here and move on to painting him. I thought about adding mek boy odds-n-ends, but with the huge pack and choppa-tool, it might get too busy (if it's not already).
Besides, I need to scratch up some kannons so I can actually play a game...


See him finished here.

Friday, December 4, 2009

KFF BIG MEK...

...surprise surprise, a WIP. I wonder if I'll ever be able to post a finished project...


See him finished here.

Wednesday, November 11, 2009

Because I don't know how to post it on your site...

...and because you wouldn't want it there anyway.

Jeff, the Raiders are looking very cool, and looking them over led to some sketching, so I thought I might as well share. The DE's look is so jagged, I wondered how that might be played up in the sail. That led to another mast, mid-ship, that the main sail attaches to. The shorter mast also has a sail, tying into the back of the ship. Ended up looking like shark fins, but I don't know, maybe that fits with your theme too.
I know the scale and shapes are off, but hopefully it still hints at the idea:
Also had an idea for material of the sail. Yes, it's probably another bad idea, but I thought I'd share it too. It seems like I remember mention of 'energy sails/fields' on a DE ship in the book Nightbringer. Not sure about that one, though. Anyway, my idea was to use 'granny-grate' (i think it's used for needlepoint, just semi-rigid plastic mesh) for the sails.
Painted in gradients, I think it could look like the ships 'crackling energy sails'. Might play into the Night Shield upgrade too, don't know much about it.
Comes in different mesh sizes:


Anyway, I've been working too long tonight, so I might be addled. Feel free to disregard, especially since the raider looks sweet as-is. Keep it up, your creativity is inspiring me to get to work on some of my own conversions/builds.